Using the Tlera Corp Gnat without Arduino
The Tlera Corp Gnat is a very compact Asset Tracker board using LoRA and GNSS technology. This article is for anyone who's interested in using the board while steering clear of anything Arduino.
Last updated:The Tlera Corp Gnat is a very neat board, but unlike most boards I've worked with so far, there doesn't seem to a data sheet or user manual that collects all the required information in a central place. The documentation it does have is very Arduino-centric.
This article attempts to fill this gap, by pointing to some useful resources, including what kind of information can be found where, and presenting some information that I figured out myself. As a bonus, it also has some hints for using the board with Rust.
Resources
First, let's start with what resources exist, and what information they provide.
1. Tindie store
The Gnat is sold via Tindie, and its page on the Tindie store presents the basic facts: What it is, what it's good for, and what hardware is on there. It is lacking some important information, for example how the Arduino pin names map to STM32 pin names, and other such details.
2. STM32L0 Arduino core
The microcontroller used on the Gnat is an STM32L082, which this repository provides support for. Despite it being missing from the README, the core directly supports the Gnat.
This repository contains some absolutely essential information: The mapping between the Arduino and STM32 pin names.
3. CMWX1ZZABZ repository
The Gnat's creator maintains a repository with Arduino sketches for the Murata CMWX1ZZABZ (the Gnat's main module, containing the microcontroller and LoRa radio). That repository has a subdirectory for the Gnat, which contains an Arduino sketch, as well as a driver for the BMA400 (the Gnat's accelerometer).
I haven't tried anything in that repository directly, but I do find it useful to have some (presumably) functional code to look at whenever I'm struggling with getting my own stuff working.
How to upload a program
The Gnat doesn't come with an on-board programmer, so if you're used to having these, how to upload a program will not be immediately obvious.
STM32 microcontrollers come with a built-in bootloader. On the Gnat, it is exposed via the USB port. This bootloader speaks a protocol called DFU, so you need a tool that understands that. I use and recommend dfu-util. There's a script using that in the rust-gnat repository.
Before dfu-util (or something else) can talk to the bootloader, it needs to be running first. You can start the bootloader by resetting the microcontroller while the BOOT signal is asserted. In practical terms, this means the following:
- Press the BTN button on the Gnat and hold it down. BTN is connected to the BOOT signal.
- Press the RST button to reset the device. Don't hold it down.
- Let go of BTN.
Yes, this is kind of a challenge for anyone with normal-sized (or above) fingers, but that's the price you pay for a small form factor. If you were successful, the bootloader should be running now, and a DFU-capable program on the host PC should be able to recognize it.
Connecting things
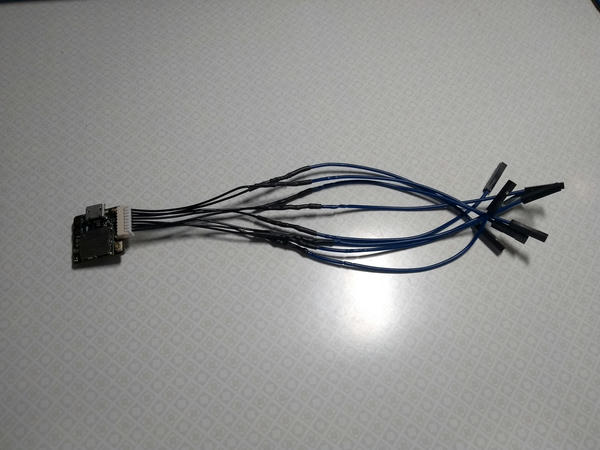
The Gnat has 8 external pins that you can connect other stuff to. Due to the small size, this is not your standard connector that you can just solder a pin header to. What you need is a Molex PicoBlade.
The Gnat's Tindie store page links to a specific connector, but that's an SMT connector and I'm not sure it's the right one. I've had success with a through-hole connector (part number 53048-0810). You also need a cable.
I've simply cut the cable in half, found 4 standard female-female jumper wires, cut those in half too, and soldered all of it together. If you're about as good at soldering as I am, the result might look something like this:

(click for full size)
Now you have some standard-sized wires to connect things to. Theoretically, these "things" include an external programmer, which would make uploading programs easier, as well as enable debugging. Unfortunately I couldn't get this to work.
I'm not sure what the problem is. Maybe my board is busted, or maybe I'm doing something wrong. In any case, connecting an external programmer is left as an exercise to the reader.
Using the Gnat with Rust
If you're interested in using the Gnat with Rust, you might find this repository useful: https://github.com/braun-embedded/rust-gnat
This is a very basic board support crate that I've started working on. As of this writing, it doesn't provide much of what you would expect from a board support crate, but it does have working examples, including build configuration and such.
Conclusion
In this article I shared some information I found useful when working with the Tlera Corp Gnat. If you found a mistake, have a suggestion, or have anything else to add, feel free to contact me at hello@hannobraun.com .